
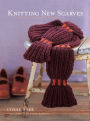

Knitting New Scarves: 27 Distinctly Modern Designs
144
Knitting New Scarves: 27 Distinctly Modern Designs
144eBookDigital Original (Digital Original)
Available on Compatible NOOK devices, the free NOOK App and in My Digital Library.
Related collections and offers
Overview
Scarves are often the first garments beginning knitters try. Then, when they feel ready for a greater creative thrill, they move on to other types of garments. In Knitting New Scarves, Lynne Barr beckons all levels of knitters back to their humble beginnings and then wows them with 27 spectacularly modern designs, each created using an innovative new technique or a unique take on a traditional one.
This novel approach, which dares knitters to rethink what is possible by simply manipulating knits and purls, leads to a collection of flattering, functional, and fun-to-make accessories. Imagine a scarf that looks like a strand of black pearls or unfolds like an accordion, one that playfully draws inspiration from the famed Chanel jacket or a twisting futuristic high-rise.
Every scarf is shown in its finished form in beautiful still-lifes by photographer Tyllie Barbosa, and, when unusual techniques are called for, up-close step-by-step photos are provided as well. This means every scarf in this masterful collection is both captivating and accessible for all levels of knitters.

Product Details
| ISBN-13: | 9781453268209 |
|---|---|
| Publisher: | ABRAMS, Inc. |
| Publication date: | 04/01/2022 |
| Sold by: | Barnes & Noble |
| Format: | eBook |
| Pages: | 144 |
| File size: | 31 MB |
| Note: | This product may take a few minutes to download. |
About the Author
TYLLIE BARBOSA is a Chicago-based photographer specializing in food and product photography.
LYNNE BARR has led hand-knitting workshops in the U.S., taught machine knitting to factory workers in Haiti, and designed sweaters for upscale boutiques. With her husband she designed and produced a commemorative sweater for L.L. Bean and co-authored two books: Sweaterscapes of the North Country and Sweaterscapes of the American West. Barr lives in Maine.
Read an Excerpt
Knitting New Scarves
By Lynne Barr, Melanie Falick, YLLIE BARBOSA
ABRAMS
Copyright © 2007 Lynne BarrAll rights reserved.
ISBN: 978-1-4532-6820-9
CHAPTER 1
Before You Start
A Note on Techniques
Near the start of each pattern you will see a list of the techniques required. All of these techniques—there are ten of them—are explained in detail at the back of the book (beginning on page 126). Some of them, like Intarsia and Short Row Shaping, are very common; others, like Rib Division (a way of dividing up knit and purl stitches so they can be worked separately for a while and then can be reconnected later) and Interlocking Stitches (a method for attaching stitches from a finished piece to stitches live on a needle) may be new to many knitters. All of these techniques are used in scarves throughout the book. In addition, within some of the patterns, you will find further instruction for techniques that are only used for that specific scarf (though, of course, you can choose to apply them in your own designs as you like).
To avoid having to flip back and forth between the actual scarf patterns and the technique instructions given at the back of the book, I suggest that you photocopy the technique pages you need from the back and then place them next to the pattern instructions you are following. Before too long the new techniques will become second nature and you will not need the photocopies, but until that happens, I think you will find this setup helpful.
A Few Words About Ribs
Since my primary interest was in form and structure, I didn't spend time creating decorative stitch patterns for the scarves. Most of them are simply worked in Garter for its ability to hold a shape, and Rib for its efficacy in shaping by dividing and combining stitches. I don't have anything to add about Garter, but I do have a few words about Ribs.
I've considered why, in spite of efforts to avoid it, ribs spread and practically double in width for some knitters but not others. My current theory is that it's due to how the working yarn is carried back and forth between the needles when changing from purl to knit. A stable rib does not depend on tightly wrapping the yarn around a needle when making a new stitch. Trying to work tight stitches will just make it hard to maintain a consistent stitch gauge. But, you do need to add some tension when carrying yarn between needles to avoid slack between stitches. It's the slack yarn between stitches that causes the spread. This explanation works for me, but I'm sure there are other knitters with other theories to share.
Skill Levels
I haven't assigned a skill level to the individual patterns, because I think this is best judged by each of you. I have tried to include what I think is a range of patterns from easy to challenging. Reading through the introductions I've written for each scarf may help you decide which scarf is right for your abilities, and only you know how much of a challenge you're in the mood for. This book is about knitting "new" scarves—that is, thinking about what scarves are and how they can be knit in new ways. So when you come upon a concept or technique that is new to you, I hope you will embrace it. Though some of these scarves take more concentration than others, I assure you that all of them are exciting to create once you get going.
Aria
This scarf was inspired by a spectacular, broad-leafed seaweed with fluttering edges called Laminaria. I wanted it to be more than just a large ruffle, so I created a wide central core with narrow rippled edges. If you prefer a narrower scarf, you can easily decrease the width by eliminating some of the central Garter stitches.
Finished Measurements
7" wide x 46" long (or 52" if worked using 3 hanks B)
Yarn
Karabella Yarns Aurora 8 (100% merino wool; 98 yards / 50 grams): 4 balls #5 Red (A)
Koigu Painter's Palette Premium Merino (KPPPM) (100% merino wool; 175 yards / 50 grams): 2 hanks #P816 (B) (or 3 hanks if you work 52" length)
Needles
One pair 10" straight needles size US 9 (5.5 mm)
Change needle size if necessary to obtain correct gauge.
Gauge
13 ½ sts = 4" (10 cm) in Garter stitch (knit every row), with 1 strand each of A and B held together
Technique
Short Row Shaping (see page 140)
With one strand each of A and B held together, CO 30 sts.
Work Pattern followed by Reverse Pattern.
Pattern
ROW 1: P6, K1-tbl, K16, K1-tbl, K6.
ROW 2: Repeat Row 1.
ROW 3: P5, W&T, K5 back to side edge.
ROW 4: P3, W&T, K3 back to side edge.
ROW 5: P6, hiding wraps, K1-tbl, K16, K1-tbl, K6.
ROWS 6-8: Repeat Rows 3-5.
ROW 9: P6, K1-tbl, K16, K1-tbl, K6.
ROW 10: Repeat Row 9.
Reverse Pattern
ROW 1: K6, K1-tbl, K16, K1-tbl, P6.
ROW 2: Repeat Row 1.
ROW 3: K5, W&T, P5 back to side edge.
ROW 4: K3, W&T, P3 back to side edge.
ROW 5: K6, hiding wraps, K1-tbl, K16, K1-tbl, P6.
ROWS 6-8: Repeat Rows 3-5.
ROW 9: K6, K1-tbl, K16, K1-tbl, P6.
ROW 10: Repeat Row 9.
Continue working, alternating Pattern with Reverse Pattern, until the Scarf measures 46" (or 52" if using 3 hanks of B).
BO all sts in the pattern of the last completed row.
Black Pearls
Maybe you would prefer to knit white pearls or multicolored beads. Whichever you choose, you should be aware that people like to squeeze and play with this scarf. Knitting Pearls in public could be hazardous to the progress of your knitting! There is a lot of decreasing and increasing as you knit around, but the knitting progresses rapidly and each completed Pearl brings with it a wonderful sense of accomplishment.
Finished Measurements
Approximately 62" long
Small (Medium, Large) Pearls: approximately 2" (2 ½", 3") diameter, stuffed
Yarn and Stuffing
Peace Fleece Worsted Weight Knitting Yarn (70% wool / 30% mohair; 200 yards / 4 ounces): 2 skeins Fathers Gray
Peace Fleece Batting (wool / mohair): approximately 8 ounces Fathers Gray, for stuffing
Needles
One set of four 5-6" double-pointed needles (DPN) size US 8 (5 mm) Change needle size if necessary to obtain correct gauge.
Notions
Stitch marker
Gauge
17 sts = 4" (10 cm) in Garter stitch (knit 1 rnd, purl 1 rnd)
Technique
Knitting Around (see page 136)
Notes
Stuff Pearls enough to hold a round shape, but not so densely that they feel hard.
CO 6 sts; divide sts evenly among 3 needles [2 sts per needle]. Join for working around, being careful not to twist sts; place marker for beg of rnd. Work 8 small, 9 medium, and 8 large Pearls in order to create scarf shown. Or, knit Pearls in whatever size and order you like.
Small Pearl
Begin with 6 sts [2 sts on 3 needles].
RND 1: *K1-f/b; rep from * to end of rnd [12 sts].
RNDS 2, 4, 6, 8, 10, 12, 14, AND 16: Purl.
RND 3: *K1, K1-f/b; repeat from * to end of rnd [18 sts].
RND 5: *K2, K1-f/b; repeat from * to end of rnd [24 sts].
RNDS 7, 9, 11, AND 13: Knit.
RND 15: *K2, K2tog; repeat from * to end of rnd [18 sts remain].
RND 17: *K1, K2tog; repeat from * to end of rnd [12 sts remain]. Stuff Pearl with batting.
RND 18: *P2tog; repeat from * to end of rnd [6 sts remain]. Do not break yarn. Carry yarn from one Pearl to the next.
Medium Pearl
Begin with 6 sts [2 sts on 3 needles].
RND 1: *K1-f/b; rep from * to end of rnd [12 sts].
RNDS 2, 4, 6, 8, 10, 12, 14, 16, 18, AND 20: Purl.
RND 3: *K1, K1-f/b; repeat from * to end of rnd [18 sts].
RND 5: *K2, K1-f/b; repeat from * to end of rnd [24 sts].
RND 7: *K3, K1-f/b; repeat from * to end of rnd [30 sts].
RNDS 9, 11, 13, AND 15: Knit.
RND 17: *K3, K2tog; repeat from * to end of rnd [24 sts remain].
RND 19: *K2, K2tog; repeat from * to end of rnd [18 sts remain].
RND 21: *K1, K2tog; repeat from * to end of rnd [12 sts remain]. Stuff Pearl with batting.
RND 22: *P2tog; repeat from * to end of rnd [6 sts remain]. Do not break yarn. Carry yarn from one Pearl to the next.
Large Pearl
Begin with 6 sts [2 sts on 3 needles].
RND 1: *K1-f/b; repeat from * to end of rnd [12 sts]. RNDS 2, 4, 6, 8, 10, 12, 14, 16, 18, 20, AND 22: Purl.
RND 3: *K1, K1-f/b; repeat from * to end of rnd [18 sts].
RND 5: *K1, K1-f/b; repeat from * to end of rnd [27 sts].
RND 7: *K2, K1-f/b; repeat from * to end of rnd [36 sts]. RNDS 9, 11, 13, 15, AND 17: Knit.
RND 19: *K2, K2tog; repeat from * to end of rnd [27 sts remain].
RND 21: *K1, K2tog; repeat from * to end of rnd [18 sts remain].
RND 23: *K1, K2tog; repeat from * to end of rnd [12 sts remain]. Stuff Pearl with batting.
RND 24: *P2tog; repeat from * to end of rnd [6 sts remain]. Do not break yarn. Carry yarn from one Pearl to the next.
Finishing
Cut yarn after final Pearl, leaving a 6" tail; thread through remaining sts, pull tight, and fasten off.
Weave in tail at both ends.
Carumboa
Making this scarf is a great way to use up bits of yarn leftover from finished projects. It is also a perfect project for teaching children to knit. If you choose to work with a child on this scarf, I recommend letting the child knit the background sections while you knit the cross-through pieces and interlock them. Eight stitches by seventeen rows should work up in no time for a child, who will quickly move on to a new piece with a different color or yarn, avoiding potential boredom. Cast-on and bind-off instructions will stick with them, because they will have reason to practice those frequently on each new piece. If interest begins to wane before the scarf is long enough to wear, then look for some ribbon to attach to each end and transform it into a necklace.
Finished Measurements
Approximately 3" wide x 66" long
Unit length: 1 ½", when strung on elastic cord
Note: 8 units will make approximately 12" of Scarf. Scarf shown is made with 44 units.
Yarn
Harrisville Designs New England Highland (100% pure wool; 200 yards / 100 grams): 1 hank each #65 Poppy, #66 Melon, #40 Topaz, #39 Russet, #2 Red, #46 Oatmeal, #47 Suede, #48 Dove Grey, #45 Pearl, #50 Black
Note: This Scarf only used a small portion of each hank (approximately 15 grams / ½ ounce).
Needles
One pair double-pointed needles (DPN) size
US 8 (5 mm)
Change needle size if necessary to obtain correct gauge.
Gauge
16 sts = 4" (10 cm) in Garter stitch (knit every row)
Notions
Tapestry needle; 1 spool .8 mm clear elastic cord (available at bead stores and craft stores that carry beading supplies)
Technique
Interlocking Stitches (see page 130)
Notes
Carumboa is made of 44 individual units (each consisting of a Background Piece and Cross-Through Piece) strung together like beads onto a clear elastic cord.
Make Units
Make an assortment of solid-color and two-color units. For a solid-color unit, work the Background and Cross-Through Pieces in the same color. For a two-color unit, work the Background and Cross-Through Pieces in different colors. You can weave in tails on the individual units and string them onto the cord as you finish them.
Background Piece
CO 8 sts. Work Garter st (knit every row) for 17 rows. Bind off all sts.
Cross-Through Piece
CO 8 sts. Work Garter st for 9 rows. Do not BO sts.
Interlock Pieces
Hold needle with Cross-Through Piece in front of and halfway up Background Piece. Using Interlocking Stitches method (see page 130), interlock the two pieces to make one unit.
Continuing on the sts from Cross-Through Piece, work in Garter st for 8 rows. BO all sts.
Weave Unit Tails
Weave in ends through side sts to where pieces interlock (see Photo 1). Tie tails together and clip close to knot (see Photo 2).
Assemble Units
Using tapestry needle threaded with clear elastic cord, thread needle through center of unit, where pieces interlock, running thread alternately through one st from Background Piece and one st from Cross-Through Piece (see Photo 3).
When all units are threaded onto cord, weave ends of cord back through several end units. Secure with knot and cut cord close to knot. Note: If elastic cord is too stretchy, you may want to weave it back through all units.
Circles
Here's an eye-catching scarf that usually elicits a range of interpretations, from a comparison to octopus tentacles to a seemingly unrelated craving for little powdered-sugar donuts. Neither tentacles nor donuts were my inspiration, which actually came from the round windows of an exotic freeform house in California. If you love knitting around, you'll be in knitting heaven. Circles requires knitting around for the tubular body of the scarf, and then knitting around again and again for each of the decorative circles.
Finished Measurements
3 ¾" wide x 58" long
Yarn
Queensland Collection Kathmandu Aran (85% merino wool / 10% silk / 5% cashmere; 104 yards / 50 grams): 2 balls #120 (MC), 1 ball #135 (A) 15 yards lighter weight contrasting color scrap yarn (to be removed and discarded when you make the circle)
Needles
One set of four double-pointed needles (DPN) size US 10 (6 mm)
One set of four double-pointed needles size
US 10 ½ (6.5 mm)
One pair double-pointed needles size US 9 (5.5 mm) or smaller, for opening Scrap Yarn Slits
Change needle size if necessary to obtain correct gauge.
Notions
Stitch marker; tapestry needle
Gauge
15 sts = 4" (10 cm) in Stockinette stitch (St st) using size US 10 needles
Techniques
Knitting Around (see page 136)
Scrap Yarn Slits (see page 138)
Using MC and US 10 needles, CO 27 sts; divide sts evenly among 3 needles [9 sts per needle]. Join for working around, being careful not to twist sts; place marker for beg of rnd. Begin St st (knit every rnd). Work even until piece measures 2" from the beginning.
Begin Pattern
RND 1: Needle 1 - K2, set up Scrap Yarn Slit (SYS) across 5 sts (see page 138), K2; Needles 2 and
3 - Knit all sts.
RNDS 2-6, 8-12 AND 14-18: Knit sts on all needles.
RND 7: Needle 1 - Knit all sts; Needle 2 - K2, set up SYS across 5 sts, K2; Needle 3 - Knit all sts.
RND 13: Needles 1 and 2 - Knit all sts; Needle 3 - K2, set up SYS across 5 sts, K2.
Repeat Rnds 1-18 thirteen times. Knit around for 2", then BO.
Make Circles
Work one circle at a time. Using smaller needles, open Scrap Yarn Slits (see page 139) [10 sts].
With a US 10 ½ needle and A, knit the 5 sts on the lower needle. Insert an empty US10 ½ needle from right to left into the edge stitch between the upper and lower needles (see Photo 1).
Twist the needle clockwise and knit the stitch [11 sts] (see Photo 2).
Turn work upside down and knit next 5 sts with an empty US 10 ½ needle.
Pick up, twist, and knit another edge stitch between the needles [12 sts].
Divide the 12 sts evenly onto 3 US 10 ½ needles and knit around for 4 rows (see Photo 3).
BO all sts. Cut yarn, leaving 4" tail. Thread tail onto tapestry needle and run through MC st next to circle, to WS of Scarf. Tie both tails of circle together and trim ends. Repeat for remaining circles.
Cocoons
This scarf is a series of loosely knit pockets filled with batting, each separated from the next by a tightly knit rib. When knit to the length shown here, Cocoons is more of a decorative accessory than a functional warm scarf, but it can easily be lengthened to wrap multiple times around the neck for greater cold-weather efficacy.
Finished Measurements
4" wide x 48" long
Yarn and Stuffing
Habu Textiles Cotton Linen Cord (54% cotton / 46% linen; 65 yards / 1 ounce): 4 ounces
#11 gray
Habu Textiles Bamboo Fiber (100% bamboo):
2 ounces, for stuffing
Needles
One set of three double-pointed needles (DPN) size US 8 (5 mm)
One set of three double-pointed needles size
US 10 (6 mm)
One pair double-pointed or single-pointed needles size US 4 (3.5 mm)
Change needle size if necessary to obtain correct gauge.
Gauge
15 sts = 4" (10 cm) in Stockinette stitch (St st) using largest needles
Techniques
Combine Stitches (see page 129)
Rib Division (see page 130)
Knitting Around on Two Double-Pointed Needles (see page 137)
Using US 8 DPNs, CO 24 sts. Work in K1, P1 rib, slipping first K st of each row knitwise.
Work rib for 4 rows.
Make Cocoon Pouch
Using Rib Division method (see page 130), divide sts onto two DPNs (12 sts each needle).
With US 10 DPNs, knit 12 sts on front needle, turn and knit 12 sts on next needle (see Knitting Around on Two Double-Pointed Needles, page 137). Continue knitting for 3 rounds.
Moderately stuff the Pouch with bamboo fiber shaped into a cocoon.
(Continues...)
Excerpted from Knitting New Scarves by Lynne Barr, Melanie Falick, YLLIE BARBOSA. Copyright © 2007 Lynne Barr. Excerpted by permission of ABRAMS.
All rights reserved. No part of this excerpt may be reproduced or reprinted without permission in writing from the publisher.
Excerpts are provided by Dial-A-Book Inc. solely for the personal use of visitors to this web site.
Table of Contents
Contents
Introduction,Before You Start,
Aria ,
Black Pearls,
Carumboa,
Circles,
Cocoons,
Drifting Pleats,
Easy Wave,
Flapper,
Fringe,
Hourglass,
Labyrinth,
Linked Rib,
Meandering Stripes,
New Wave,
Parallelograms,
Peek,
Reversible,
Shag,
Shawl Collar,
Stacked Wedges,
Striped Illusion,
Striped Wedges,
Tilted Blocks,
Tricorner,
Twisted,
Woven Cords,
ZigZag,
Techniques ,
Abbreviations and definitions ,
Yarn Sources,
Acknowledgments,