
Revel in the fun of cooking with live fire. This hot collection from food historian and archaeologist Paula Marcoux includes more than 100 fire-cooked recipes that range from cheese on a stick to roasted rabbit and naan bread. Marcoux’s straightforward instructions and inspired musings on cooking with fire are paired with mouthwatering photographs that will have you building primitive bread ovens and turning pork on a homemade spit. Gather all your friends around a fire and start the feast.
Revel in the fun of cooking with live fire. This hot collection from food historian and archaeologist Paula Marcoux includes more than 100 fire-cooked recipes that range from cheese on a stick to roasted rabbit and naan bread. Marcoux’s straightforward instructions and inspired musings on cooking with fire are paired with mouthwatering photographs that will have you building primitive bread ovens and turning pork on a homemade spit. Gather all your friends around a fire and start the feast.

Cooking with Fire: From Roasting on a Spit to Baking in a Tannur, Rediscovered Techniques and Recipes That Capture the Flavors of Wood-Fired Cooking
320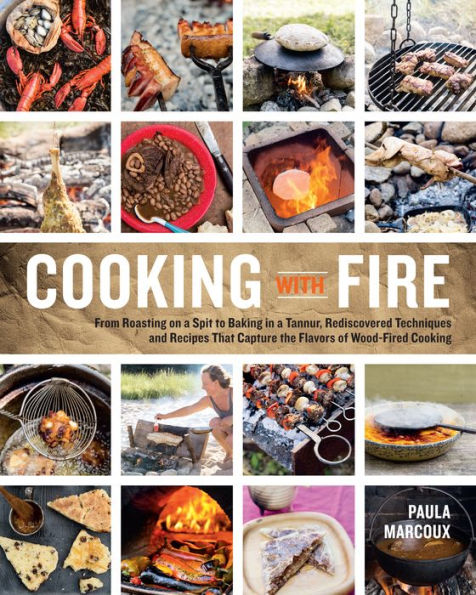
Cooking with Fire: From Roasting on a Spit to Baking in a Tannur, Rediscovered Techniques and Recipes That Capture the Flavors of Wood-Fired Cooking
320eBook
Available on Compatible NOOK devices, the free NOOK App and in My Digital Library.
Related collections and offers
Overview
Revel in the fun of cooking with live fire. This hot collection from food historian and archaeologist Paula Marcoux includes more than 100 fire-cooked recipes that range from cheese on a stick to roasted rabbit and naan bread. Marcoux’s straightforward instructions and inspired musings on cooking with fire are paired with mouthwatering photographs that will have you building primitive bread ovens and turning pork on a homemade spit. Gather all your friends around a fire and start the feast.

Product Details
| ISBN-13: | 9781603429122 |
|---|---|
| Publisher: | Storey Publishing, LLC |
| Publication date: | 05/16/2014 |
| Sold by: | Hachette Digital, Inc. |
| Format: | eBook |
| Pages: | 320 |
| File size: | 48 MB |
| Note: | This product may take a few minutes to download. |
About the Author
Paula Marcoux is a food historian who lives in Plymouth, Massachusetts; she has worked professionally as an archaeologist, cook, and bread-oven builder. She is the food editor of Edible South Shore magazine, writes on food history topics for popular and academic audiences, and consults with museums, film producers, and publishers. She also gives regular workshops on natural leavening, historic baking, and wood-fired cooking. Her web site is www.themagnificentleaven.com.
Read an Excerpt
CHAPTER 1
A Fire and a Stick
It all starts with the fire.
Humans have been at this cooking business for a very long time — as long as 1.9 million years, according to a recent and brilliant reinterpretation of hominid development that positions cooked food at the crux of a major evolutionary watershed. Thanks to our capability of controlling fire and applying it to food, we developed a smaller digestive tract, and smaller mouths and teeth. More importantly, we saved hours a day in chewing time, freeing us up to do things like invent bread, pottery, beer, kebabs, bellows, tamales, accounting, and cheese.
One million, nine hundred thousand years. That's hundreds of millennia we've been cooking, while adapting our understanding of fire and its interactions with food to all kinds of changing conditions. We humans have cooked our way into and through ice ages, deforestation and desertification, falling seas and rising seas, global migrations, mass extinctions of megafauna, the domestication of plants and animals, wars, displacements, and enslavement. And that's all before written history began.
Archaeology hints at some of the rich culinary traditions and ingenious foodways practices of bygone cultures over the millennia. Among some living cultures, a strong oral tradition still preserves food techniques and knowledge a century or more old. But our earliest written recipes are only a few thousand years old, which means that most of the vast spectrum of past human cooking traditions is unknowable to us.
Back to Basics
In the first section of this book, we'll consider using fire for cooking at its most elemental level, without the intermediaries of pots and pans, spits and grills, griddles and ovens. Just live fire and a stick.
Why cook without pottery and metal? First, it's a great way to reintroduce yourself to fire. Spending some quality time with fire, while observing and manipulating it and its relationship with food without any technological barriers, is a great way to understand this primordial element. Regardless of what you cook, you pay attention differently when it's just the fire and the food.
Plus, it's fun; there's a reason we liked to cook things on sticks when we were kids. Oddly, in our culture, it's unusual for grownups to continue the practice. But, with the right group, it's a very social experience. Everyone around the fire is involved in producing their own meal, often at a leisurely pace.
And last, it develops respect for the millions of cooks who have gone before: parching grains on hearths, cooking roots or eggs in hot ashes, roasting bits of meat on sticks. All of these techniques require skill and attention to perfect; once you can cook without tools, the rest is cake.
Ultimately, nothing beats taking on a fun cooking project with a bunch of friends or launching some crazy food production as an entertainment at a social event. But to nurture the relationship that makes all this possible, I recommend spending some quality time alone with fire first. Observe how it behaves in different settings with different fuels, and how it reacts to small changes you make to its arrangement, and then, how it works to cook your food. If you've done a lot of grilling, or are already really good at building fires, you may feel like this exercise doesn't apply to you. But I feel that there's always something new to understand and there's never anything to be lost from the quiet, active contemplation of fire.
Making a Fire — Before You Start
This first series of exercises may be undertaken indoors at a fireplace, or better yet, outdoors on the ground.
Assemble everything you need at arm's reach before you strike a match. For the fire I have in mind, that would be kindling (an armload of dry sticks and twigs of varying sizes), in an amount you can gather in a basket or box or bucket in five minutes' time while wandering around the yard. If that doesn't describe where you live, you may want to get in the habit of traveling with such a receptacle so that you can snag kindling as you cross its path. For the purpose of today's exercise, pick up both hardwood and softwood materials; both have their place in firemaking and cooking. Later on in the exercise, you'll need three or four pieces of split hardwood. You will find a sturdy, sharp knife handy. And, of course, you will need an igniter: matches, lighter, ember from another fire, magnifying lens, bow drill, or flint and steel.
Making a Fire: Materials
Hardwoods like these burn down to great coals for cooking, regardless of size. Material for kindling a fire may be produced from larger wood by carving or splitting off shavings or splints with a sharp, sturdy knife.
Hardwoods versus Softwoods
Softwoods, like pine, are generally more volatile than hardwoods, which is why they are usually preferable for fire starting. Hardwoods, like oak, maple, and hickory, are a denser source of carbon, the primary component of the coals that will be left on your hearth when the flames have died down. (Smokeless, very hot-burning natural charcoal is the almost-pure carbon material that remains when the volatiles are burned out of hardwood in an oxygen-poor environment.)
Thus, hardwood is preferred for most hearth cooking. It is the deep and even heat emanating from a pile of coals that roasts and grills, maintains a steady simmer in a pot, and blasts one thousand degrees of searing heat at your pizza. Even frying, which favors the quick heat from thinly split pine, benefits from the steadying effect of a bed of hardwood coals underlying the whole operation.
However, pine has its place and one unassailable advantage in that, due to its undesirability as fuel for woodstoves and other heating, it is often given away freely. I am quick to snag it and salt it away for kindling, for boiling and frying in cast iron, for recreational burning, and most of all for heating wood-fired bread ovens, a task at which it excels.
Kindling Your Fire
If you're at an indoor fireplace, open the damper in the flue, and shove any andirons or any other unnecessary appurtenances out of the way. Indoors or out, have a quick look to make sure that flammable things are not contiguous to your fire zone. Dried-flower arrangements, the Christmas tree, a pile of leaves, your double-knit leisure suit ... all these should be moved away from the fire area. I have seen each one of these items burn, and you don't want to be surprised by that kind of sudden ignition.
There is no need to be dogmatic about a fire-making approach, except that you should expect to adapt your strategy to the materials at hand. This is a way that works for me, given the type of materials described above.
Bearing in mind that fire is composed of just as much oxygen as fuel, lay one softwood stick in the middle of the hearth and set another so that one end sits across the end of the first one. Where they cross, lean a number of very small sticks or twigs.
Take a sturdy knife and pare off some fine strips of softwood; or, shred up the inner bark from a cedar tree, or pull apart a chunk of white birch bark, or drop in a handful of dry pine needles. Top this puffy pile with a few more medium sticks to anchor it and give the fire something to catch on to.
Have a bunch of broken-up dry sticks handy to feed the fire, as well as the next size of fuel you plan to burn, in this case, just larger sticks, broken or sawn or chopped to a manageable length. If you have the proper tool — a big sturdy knife works — splitting dry sticks into smaller splints really increases the likelihood of their igniting easily.
Look at your fire setup. At its nexus should be something that looks like a little bird's nest of puffy wood fibers; touch your match there to kindle your fire. When it appears to have caught, add a few more small pieces without collapsing your structure. Visualize oxygen coming up from beneath your little nest of fire, driving the flames into the fuel. Be patient and allow each addition to truly catch; introduce slightly larger pieces gradually and precisely. As this arrangement burns and collapses, it will ignite the foundation sticks below.
Step-by-Step
Kindling a Fire
1. Lean one piece of small, dry wood on another to establish an open foundation through which oxygen will be drawn to nourish the fire.
2. Provide an airy, puffy nest of wood fiber — here just shavings pared from the same oak scraps we intend to cook with — and stick a match or other igniter in it.
3. Have more small stuff at hand, both to stabilize and fuel the fire. Maintain the open structure so that air continues to flow from beneath.
4. Gradually, without collapsing the fire's structure, add more and larger fuel to help it gain strength. Keep an eye on its progress while resisting the urge to overtend.
Firewood Storage
Whether hardwood or softwood, the most desirable characteristic in any of your fuel is dryness. Unless you live in a very arid environment, keeping firewood under cover is a must. Use an airy woodshed, a lean-to, a sheet of plywood over a stack — find some manner of keeping water from getting into your woodstack, while letting air circulate.
It pays to sort your fuels, too, as you store them. Short chunks of oak for roasting, long straight pine that splits easily for firing the oven or frying, nice dry apple for smoking — the uses of these woods are so specific that it's silly to store them in a jumble. They are rarely interchangeable.
Be sure to have a separate and accessible pile of less-wonderful wood that's just for non-culinary burning. When late-night enthusiasm takes hold of your guests, make sure the pyros have something expendable to burn.
Making a Coal Bed
If you have begun to add some hardwood sticks to your little fire, you've already taken the first step in getting a real cooking fire going — creating some coals. As inconsequential as these first tiny coals may seem, the success of most hearth cooking operations basically comes down to having the right volume of those glowing lumps of smoldering carbon in the right place at the right time. So let's make some more. When you have an actively burning small fire composed of sticks that are large enough to support them, place a couple of pieces of split hardwood on the structure. They should be more or less parallel, and nearly touching, over the center of the fire, so that the flames and oxygen from below are forced to pass between them, hastening ignition of the new wood.
Experiment with this proximity phenomenon as you add more fuel and adjust the fire with a stick or poker. Notice what happens when you push things closer together or pull them further apart. You'll find that there is an optimal distance, determined by a great many variables and worthy of an honors physics project, which provides for the most efficient combustion of fuel in any particular fire. No two fires will be exactly the same in this regard. Fortunately, you don't have to resort to some sort of algorithm to calculate this factor. In fact, the knowledge is almost intuitive; some folks make absolutely perfect fires all their lives without even thinking about it for a second. I describe the phenomenon because it is the first thing to look at when a fire is not behaving to your liking. Wood piled too close together on an uncertain fire will tend to smother it, especially if the air flow from below is choked off. On the other hand, fuel scattered too widely deprives the fire of the intensity it should have; it's as if you are nursing several small fires rather than enabling one focused act of combustion. When the wood is just the right distance apart, and oxygen is whooshing into it from beneath, your fire is burning optimally.
Step-by-Step
Making a Coal Bed
1. Start the transition from softwood to hardwood with twigs and sticks, or small split material.
2. Coals will form from hardwood of any size. A big pile of small wood is a quicker route to a roasting fire than a small pile of big wood.
3. As you add more hardwood, be sure to maintain an open structure to the fire, so that air can whoosh up through the fuel and feed the flames.
4. New fuel goes to the back of the fire, coals come out from the front. Also, you can just push a well-established fire aside to access the coals that have formed beneath.
Fire-Poking Caveats and the Sacrificial Fire
One thing you may discover in experimentally poking your test-fire is that the wrong kind of poking can just about extinguish a healthy blaze. In fact, more than once a certain dear friend has, in the course of telling an especially engrossing story, reduced a virtual bonfire to a scatter of smoldering logs before we wrestled her poking stick away. Now she surrenders it voluntarily when the narrative starts to get good.
Would that all guests had such self-knowledge. Once you have developed a sense of purpose about fire, you may find that you need to restrain well-meaning people from destroying your handiwork. Worse, still, than the accidental extinguisher is the zealot on the other end of the spectrum — the pyromaniac. The cook comes back from an errand in the house to find that an inferno has singed the roast, scorched the soup, and even cracked the pot. Sometimes the powers of these, usually macho, interlopers may be deflected toward the good — turning a roast on a spit, for instance. In the case of children, fearful parents are often allies ("Stop waving that firebrand before you put someone's eye out!"). But I have found that the most effective and least painful way of preserving the integrity of a cooking fire at a large party is to set up a more attractive, purely recreational fire a little distance away. Everyone gets to have fun, and dinner gets cooked, too.
Getting Started: Roasting on a Stick
Artfully add a few more pieces of hardwood, and you have a cooking fire underway. It's just a matter of time until a small coal bed forms beneath the logs, all ready to perform its alchemy on a dish of food. However, before we get to the sublime, let's start with the ridiculous: the marshmallow. That's right, the lowest common denominator of campfire cooking.
Well, the marshmallow, silly as it is, is a great learning tool. Its sugary ingredients make it highly responsive to heat, so that to toast one is like roasting real food on fast-forward. Yet it is rare to observe a marshmallow-cook, adult or child, who takes the task seriously. Most marshmallows go down in flames, an inevitable end for a ball of aerated sugars suspended thoughtlessly over a pine inferno. But every now and again I see a crafty and patient individual who firmly plants the confection on a greenwood stick, who scopes out the fire for a perfect little hearth of coals at its base, and who turns and turns the rigid gummy cylinder into a perfectly molten blob encased in a crisp, even, golden-brown skin. Meanwhile a dozen others nearby have been immolated over the fire with protests of, "This is how I like to do it!"
So, give it a try, if you're not already one of the patient and crafty ones. Even if you do like marshmallows charred on the exterior and cold and hard at the core (and I am skeptical), accept the challenge of observing what you are doing when you cook them perfectly. Experiencing that process attentively will allow you to approach roasting anything — a chicken, a hog, an eggplant, a fish (things you really don't want carbonized on the outside and raw in the middle) — with a refreshed understanding of the task.
Correct Heat, Sufficient Support
Here are a few technical aspects to consider when roasting the marshmallow, applicable also to more involved roasting projects:
The fire. People don't make high-quality roasting fires to cook marshmallows, but that's okay. Even the lamest campfire will have a spot that can cook the perfect marshmallow. Look around the base of any fire that has been burning for an hour or so. Even if the fuel is the nastiest green pine logs, eventually something like a coal bed, sufficient for marshmallows anyway, will appear.
Sometimes the fire naturally furnishes a small cave of perfectly even heat.
The fire you just made for the foregoing exercise, though, is a high-quality affair. You may use some coals that spill out from it, or you may push the fire over a little to expose a nice coal bed for you to use easily, or you may take a fire shovel and scoop out a glowing heap of coals to put in a convenient place for your slow marshmallow-roasting pleasure. All of these approaches will serve you well in your future hearth cooking. And if you were setting about cooking some real food, a rabbit, say, you would make the same demand on your fire: coals, coals, coals.
The spit. When roasting marshmallows, use a greenwood stick. Make sure it's long enough for your comfort and stout enough that the marshmallow won't droop down into the fire. Whether or not it's necessary, the time-honored Girl Scout way is to use a knife to skin the bark off of the thin end of the stick and put a bit of a point on it.
Cooking foods on sticks has a very deep, broad, and mostly unknowable prehistory. European visitors to the Atlantic coast of North America described skillful native cooks roasting whole fish, reptiles, and small mammals propped on sticks before a fire. Pre-modern and modern stick cookery in the European tradition has usually been of the do-it-yourself snack category; cheese, sausage, bacon, toast — recreational treats functionally not unlike the marshmallow, but made of actual food.
(Continues…)
Excerpted from "Cooking with Fire"
by .
Copyright © 2014 Paula Marcoux.
Excerpted by permission of Storey Publishing.
All rights reserved. No part of this excerpt may be reproduced or reprinted without permission in writing from the publisher.
Excerpts are provided by Dial-A-Book Inc. solely for the personal use of visitors to this web site.
Table of Contents
Chapter 1 A Fire and a Stick
Back to Basics – Getting Started: Roasting on a Stick – Toasting Cheese – Roasting in Ashes and Coals – Baking Bread under the Ashes
Chapter 2 A Few Simple Tools
Spit Roasting – How to Make an Efficient and Pleasant Roasting Hearth – The Spit – Roast on a String – Cooking on Skewers – The Grill – The Schwenker – The Plank – Searing with a Hot Iron
Chapter 3 Pots and Pans
The Griddle in All Its Guises – Cakes on the Griddle – Tortillas -- Griddled Breads of Northwestern Europe – British Griddle Breads – Other Things to Cook on the Griddle – The Griddle on Steroids: The Argentine Infiernillo – Pots over Fire – The Clay Pot – Iron Pots and Pans – Shallow Frying – Deep Frying – Baking Bread in a Cast-Iron Pot
Chapter 4 More Gear
The Tannur, the Furnace, and the Potager – The Cast-Iron Cookstove – Smoke – Barbeque, Two Ways
Chapter 5 Retained Heat
Underground Inspiration from around the World – The Earth Oven: Cooking in a Hole in the Ground – The Masonry Oven – Building a Basic Wood-Fired Oven – Getting Ready to Bake – Heating an Oven – Cooking with an Oven Full of Fire – Getting Ready for Pizza – Using Retained Heat – The Cooling Curve – Bread for the Wood-Fired Oven – Natural Leavening for Your Wood-Fired Bread – Natural Leavening Q & A – Overnight Cooking Traditions – Overnight in a New England Brick Oven
Resources, References, and Details
Acknowledgements
Index