

Dollhouse Furnishings for the Bedroom and Bath: Complete Instructions for Sewing and Making 44 Miniature Projects
48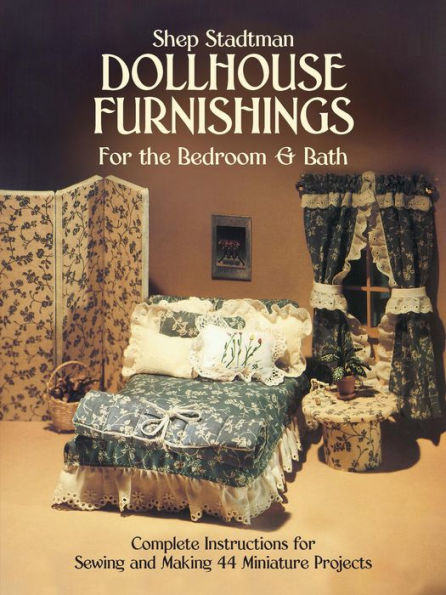
Dollhouse Furnishings for the Bedroom and Bath: Complete Instructions for Sewing and Making 44 Miniature Projects
48eBook
Available on Compatible NOOK devices, the free NOOK App and in My Digital Library.
Related collections and offers
Overview
The museum-quality dollhouse furnishings of noted designer Shep Stadtman have figured prominently in the miniatures industry for many years. Now this accomplished craftswoman shares her experience and expertise with you, showing you how to make your own high-quality furnishings.
Dollhouse Furnishings for the Bedroomand Bath offers miniature enthusiasts easy-to-follow instructions in the techniques of woodworking and sewing for small projects — plus clear step-by-step directions, patterns, and diagrams for 44 exquisite miniature projects in styles ranging from country to contemporary. Learn to make beds, bedding, quilts, pillows, night stands, draperies, shower curtains, covered headboards, braided rugs, towels, and much more.
In addition, you'll find directions for creating five complete bedroom ensembles and two complete bathrooms — each with a distinctive décor of its own.
No dollhouse is truly complete without a properly embellished suite of bedrooms and a tastefully appointed bath. Dollhouse enthusiasts will find in this marvelous book all the information they need to turn a miniature house into a breathtaking showpiece.

Product Details
| ISBN-13: | 9780486164014 |
|---|---|
| Publisher: | Dover Publications |
| Publication date: | 04/07/2014 |
| Sold by: | Barnes & Noble |
| Format: | eBook |
| Pages: | 48 |
| Sales rank: | 442,601 |
| File size: | 4 MB |
Read an Excerpt
Dollhouse Furnishing for the Bedroom & Bath
Complete Instructions for Sewing and Making 44 Miniature Projects
By Shep Stadtman
Dover Publications, Inc.
Copyright © 1984 Shep StadtmanAll rights reserved.
ISBN: 978-0-486-16401-4
CHAPTER 1
Miniature Woodworking
Whether you want to duplicate the luxurious room settings shown here, experiment with an original fantasy or reproduce rooms in your own home, you must do first things first—you need the furniture before the quilt, curtains, rugs or any other decorating accessory. You can go out and buy the furniture you will need or you can create your own originals.
This chapter will guide you through working with wood on a small scale so that you can make miniature furniture even if you've never driven a nail, used a saw or sanded a rough edge! In fact, most of the tools in your toolbox will not help you make miniatures—they are too big. One reason that this craft is so popular is because you can make the pieces on your kitchen table using a toothpick and glue instead of a hammer and nails! The following pages combine a general lesson in miniature woodworking with general directions for the pieces in this book. But before you start any project, remember: Read all the directions, organize the steps of your project, gather all your materials and equipment to your working area and measure everything twice!
Equipment
When making miniatures, keep in mind that common household objects can frequently take the place of specific tools. For example, an emery board can sand all but the most detailed softwood shapes, and a single-edged razor blade can saw through many types of wood. You will save time and money by using a Qtip as a paintbrush, rubber bands as clamps or a toothpick to spread glue.
I have consciously omitted power tools because they are not necessary for the production of many miniatures, including the pieces in this book. However, a power handsaw, such as a jigsaw or saber saw, would save time when cutting the plywood.
CUTTING
X-ACTO Knife: This knife uses different blades to cut various woods and thicknesses. It is probably the most frequently used cutting tool for making miniature furniture.
Scissors: Use sharp household scissors to cut straight and slightly curved balsa-wood shapes. Sharp embroidery scissors are useful for more intricate softwood cuts.
Razor Blades: A single-edged razor blade is useful when straight-cutting balsa and other softwood shapes.
Small Handsaw: Use a coping, tenon or dovetail saw to cut hardwoods, including the basswood and plywood needed for most of the pieces in this book.
Wooden Block: Make all cuts on a wooden block to prevent damage to your work surface.
JOINING
White Glue: Use white glue such as Elmer's® Glue-All™ or Sobo to join wood to wood or wood to fabric. Apply glue sparingly with a toothpick, and wipe away excess glue with a damp cloth.
Small Clamps: Small clamps will help hold pieces together while glue dries or while you are doing additional work that requires two free hands.
Tape: Tape might be the best way to hold small or irregularly shaped pieces together while gluing. Masking tape will work best.
Clothespins: Spring or regular clothespins can be used in place of small clamps.
Rubber Bands: Use rubber bands to hold pieces together in instances where the methods described above might not work, such as for the bed frames in this book.
Epoxy: Use epoxy to join metal to metal or metal to wood. Epoxies are made by mixing two substances together and letting the mixture dry for 5 minutes to 48 hours, depending on the job.
Nails: For miniature woodworking, use the smallest nails you can find, which are also called brads. They are sold in boxes of about 50.
Hammer: Use a small tack or pin hammer to nail components together. Hold the hammer by the end, not the middle, of the handle.
MEASURING
Ruler: A cork-backed steel ruler will not slip on wooden surfaces. For most miniature projects, a 12" ruler is fine. A hobby and craft ruler with increments to 1/64 would be a great help and is available in craft shops.
Pencil: Use a very sharp lead pencil to mark cutting lines on the wood. A dull point will make a thicker line, which might throw dimensions off to a noticeable degree.
T-Square: A T-square will insure accurate right angles—essential to many miniature furniture projects.
Compass: Use a compass for marking circles; remember to keep your pencil very sharp.
MISCELLANEOUS
Picks: Use a metal food pick, such as that used for nuts or shellfish, to make tiny holes.
Needles: Use sewing or knitting needles for making tiny holes in softwoods. Push needle into wood gently so as not to split the wood.
Dental Instruments: Various dental tools (if available) are wonderful for making holes, holding pieces in place, gluing, pulling pieces apart, cleaning tight areas, etc.
Sandpaper: Use extra-fine 800-grit sandpaper or the finest grit available. The finer the grit, the higher the number. Sand with the grain and wipe sanded surface with a soft cloth. For very small pieces, tape sandpaper to work surface and gently rub piece on it.
Emery Boards: In many cases, the fine side of an emery board can be used in place of sandpaper.
Paintbrush: Use a small paintbrush to paint or stain finished pieces. Before using brush, test to make sure the bristles will not fall out.
Q-Tips: In many cases, you can use Q-Tips to paint or stain wooden surfaces; they are also useful for reaching into tiny spaces to clean.
Jars: Small jars or cups are handy for storing and mixing paints, and are usually easier to handle than large cans.
Magnifying Glass: A magnifying glass will help in making accurate minute measurements, attaching tiny screws, painting fine details, etc.
Screwdriver: Use a jeweler's screwdriver for small screws.
Stirrers: Small plastic stirrers used for coffee or cocktails are useful for spreading glue, painting, reaching into small spaces, etc.
Tweezers: Use tweezers to hold small parts while working on them, or to pick up small components.
Materials
Remember to check the basement, attic and garage before buying any materials. Cigar-box wood, popsicle sticks, wooden matches, toothpicks and wooden spools are just a few examples of what you could use instead of buying wood for certain projects. Felt-tipped markers work as well as wood stain or paint in some cases, and clear nail polish makes a good sealer and shiner!
Below is a general look at the wood used for most miniature projects, together with some finishing ideas. Specific quantities, dimensions and any additional materials appear with each set of individual directions.
WOOD
Balsa Wood: Balsa wood is a very soft, lightweight wood that can be purchased in strips, squares and sheets starting at 1/32" thick.
Basswood: Basswood is harder than balsa wood. It can be purchased in 22"–24" lengths in thicknesses of 1/32" up to 2". It is also available in strips. Basswood is quite easy to work with and has a grain similar to many fine woods. It is probably the most popular wood used for making miniatures.
Hardwood Veneers: Veneers are available in a variety of grains—maple, walnut, teak, oak, cherry, mahogany, butternut, rosewood, ash, pecan, etc. Veneers are perfect for creating original miniature furniture, repairing old pieces and for covering walls and floors.
Plywood: Plywood is a hard, durable wood, available in a variety of thicknesses at lumber yards. Because plywood is usually sold in large sheets, try to buy small scrap pieces. A small handsaw is recommended for cutting plywood.
Dowels: Dowels are round wooden sticks sold at craft shops and lumber yards in 3-foot lengths and in a variety of thicknesses.
FINISHES
Acrylic Paints: For painting, acrylics are best. Apply 2 to 3 coats of paint, allowing each coat to dry thoroughly before applying the next.
Felt-tipped Pens and Markers: Felt-tipped pens and markers are excellent "paints" for small pieces of furniture or accents on larger pieces; they are available in many colors, including wood tones.
Stains: Wood stains are available in many shades; they can be brushed or rubbed onto raw wood.
Varnish and Shellac: After staining or painting, use polyurethane varnish (which is available in easy-to-use spray cans) or shellac to seal the piece and add highlights. In some cases, clear nail polish will give a shiny, hard finish.
Making Miniature Furniture from Wood
BEDS
Materials and Equipment for Each Bed (for canopy bed, see individual directions for additional materials): ¼" plywood, 14" × 8" piece. Small handsaw. Fine sandpaper. White glue. Steel ruler. Rubber bands. Sharp pencil.
Directions: Refer to Figure 1 for assembly.
1. Cut the plywood into the following pieces:
Top: one 4 ½" × 6 ¼" piece
Ends: two 1" × 4" pieces
Sides: two 1" × 6 ¼" pieces
Headboard: one 4" × 4 ½" piece
2. Lightly sand any rough edges.
3. Glue ends between sides, keeping bottom and outer edges flush and creating a 4 ½" × 6 ¼" frame.
4. Glue top over frame, keeping outer edges flush; let glue dry thoroughly. If desired, nail brads around edge of top, securing top to frame.
5. Shape the headboard following individual directions, and cover with fabric following the directions on page 12. Glue headboard to one end of bed, keeping bottom edges flush. Wrap rubber bands around base of bed until glue dries.
NIGHT TABLE
Materials and Equipment: 1/8" basswood or balsa wood, 2 ¾" circle. 1 ½" dowel, 1 ½-long piece. White glue. Pencil. Compass.
Directions: Refer to Figure 2 for assembly.
1. Using a compass, draw a 1 ½—diameter circle in the center of the 2¾" circle.
2. Glue dowel piece into marked circle as shown in Figure 2; let dry.
SCREEN
Materials and Equipment: ¼" plywood, 6" × 7" piece. Four miniature brass flush or butt hinges. Pencil. Ruler. Small hand or power saw. White glue. Tiny screws and jeweler's screwdriver (optional).
Directions: Refer to Figure 3 for assembly.
1. Cut plywood into three 2" × 7" panels. Lightly sand any rough edges. Cover panels with fabric following individual directions, or paint to match your other furnishings.
2. Attach panels to each other with brass hinges glued ½" from ends as shown in Figure 3. For added support, attach hinges with screws.
CURTAIN RODS
Materials and Equipment: X-ACTO knife. Ruler. Pencil. 1/8" wooden dowels, brass tubing or wire. Wooden or brass beads (to fit dowel, tubing or wire) for finials (jewelry findings are helpful here—look through your jewelry box or search for costume-jewelry bargains). Pins. Stain or paint, as desired. Small brushes or Q-Tips.
Directions: Refer to Figure 4 for assembly.
1. For bedroom curtains, cut dowel, tubing or wire ½" wider than your window. For shower curtain, cut dowel, tubing or wire to appropriate size: ½" wider than tub for straight rod or to measurement of sides and one long edge of tub for curved rod.
2. If using wooden dowels, stain or paint and let dry.
3. Using a pin, make starting holes for eye screws on each side of window frame or bathtub in appropriate position for rod. Carefully insert and screw eye screws into wood using your fingers.
4. Attach curtains to rod, then insert rod through eye screws. Attach bead finials to secure as shown in Figure 4.
Making Replicas of Full-Size Furniture
Making miniature versions of your own furniture is easier than you think. And wouldn't it be wonderful to hand down your own furniture, that you've made in miniature, to favorite relatives? Or how about making their furniture for them as a special gift?—it would be treasured forever. Before you start your own pieces, read the Equipment and Materials sections on pages 7–8. Practice with different woods and ways to cut them. It might be a good idea to make one or two practice pieces to get the feel of the craft before starting something as special as your own furniture. Experiment with small household tools, such as using a large sewing needle to "drill" a hole, before purchasing specific ones. Once you feel ready to start, follow these steps:
1. Measure your own piece and draw it to scale on graph paper, keeping in mind that the standard scale for making and collecting miniatures is 1" to 1'. Working in this scale will make it easier to use different sources when adding to your collection.
2. Use plywood for large, simple-shaped pieces; use either basswood or balsa wood for smaller, more delicate ones. Cut out the required shapes and sand edges lightly.
3. Stain or paint the pieces to match your own furniture. There are so many shades of wood stains and paint on the market that it would be easy to match just about any finish.
4. Once pieces are dry, glue them together and add finishing touches, drawer pulls, for example, made from links of an old necklace, small brass tacks, even bits of a toothpick. You will find that searching through "junk" drawers, jewelry boxes, garage and tag sales to find miniature treasures is just as exciting as making the actual pieces.
Once you have made a roomful of furniture, you will need a room to put them in! Containers for miniatures can range from a plywood box to a clock case. And don't overlook a small barrel cut in half, an old drawer or an antique lantern. Rummaging through the attic, thrift shops or antique stores will present you with many ideas. Use your imagination and enjoy the search.
CHAPTER 2Miniature Sewing
Decorating miniature room settings is my favorite part of making and collecting miniatures. A paisley scarf easily becomes an "oriental" carpet, while a crocheted pot holder makes a wonderful "braided" rug. You can make a patchwork quilt from ribbons, and pretty pictures from postage stamps! You don't sew? Don't let that stop you! Many "sewn" items are really glued. A few easy hand stitches or a straight stitch on the sewing machine are all you will ever use—and if you don't have a sewing machine, the items in this book can easily be completed without one.
This chapter will help you choose the right fabrics and show you the easiest way to make miniature masterpieces. It includes general directions for all of the sewn items in this book. Specific directions appear with the individual room settings starting on page 25. As with making wooden miniatures, making fabric accessories means being prepared before you start. Always read all the directions and collect the necessary equipment and materials in your working area at once. I find it helpful to keep supplies for each project in a separate shoebox. This will not only help keep things together, but it makes the projects portable—from room to room, from house to yard, even enabling you to work while traveling.
If you have decided to reproduce your own furniture, or that of a special friend or relative as discussed in Chapter 1, you wouldn't dream of decorating with just any accessories! Get scraps of matching fabric from your bedspread and curtain hems and duplicate the whole room, providing, of course, that prints or stripes are in a small scale. If you knitted or crocheted a coverlet for your bed, do it for your miniature bed using fine yarns or threads and small hooks or needles. You can even needlepoint (sometimes called petit petitpoint) or embroider pillows or chair seats. Never think that you can't do it, just think small and improvise!
Equipment
Below is a list of the equipment you will need, not only to make the items in this book, but also for most miniature sewing projects.
Scissors: Use small, sharp embroidery scissors with a fine point to cut threads and small fabric pieces. If you are cutting a large piece of fabric, use sharp dressmaker's shears.
Needles: Use small crewel needles for embroidery and needlepoint, and sharps—medium hand-sewing needles—for just about everything else.
Pins: Use small, sharp straight pins for holding fabric in place before sewing or gluing. Do not use pins that are rusted or bent.
Thimble: Some people find wearing a thimble comfortable; I do not. However, it does protect your finger—the middle finger of your sewing hand—and it would be a good idea to get used to wearing one.
Pencil: Use a sharp pencil to mark necessary dimensions and cutting lines on fabric. For dark fabrics, use a light-colored marking pencil or a piece of sharpened tailor's chalk.
(Continues...)
Excerpted from Dollhouse Furnishing for the Bedroom & Bath by Shep Stadtman. Copyright © 1984 Shep Stadtman. Excerpted by permission of Dover Publications, Inc..
All rights reserved. No part of this excerpt may be reproduced or reprinted without permission in writing from the publisher.
Excerpts are provided by Dial-A-Book Inc. solely for the personal use of visitors to this web site.
Table of Contents
Contents
Introduction
Chapter 1: Miniature Woodworking
Chapter 2: Miniature Sewing
Chapter 3: Bath Ensembles
Velvet and Lace for the Bath
Flowered Bath Set
Chapter 4: Bedroom Ensembles
Romantic Reversal Boudoir Ensemble
Country Flowers Bedroom
Satin and Lace Bedroom
White Sating Nights
Contemporary Canopy Bedroom Set
Chapter 5: Miniature Accessories
Braided Rug
Breakfast Tray
Embroidered Placemat and Napkin
Quilt Stand
Patchwork Quilt
Lampshade Cover
Posters