

I Love My Dog Embroidery: 380 Stitch Motifs for Dog Moms and Dads
120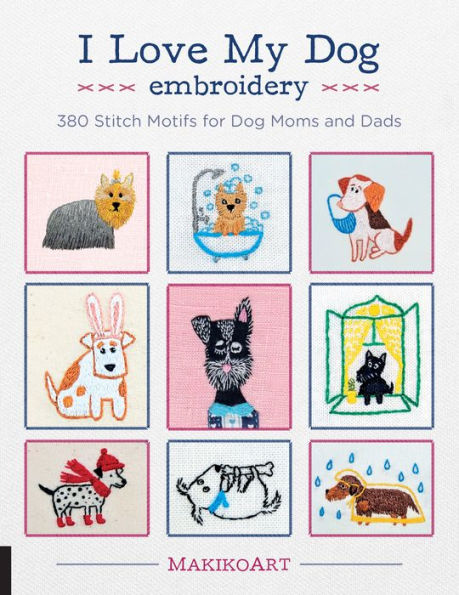
I Love My Dog Embroidery: 380 Stitch Motifs for Dog Moms and Dads
120eBook
Available on Compatible NOOK devices, the free NOOK App and in My Digital Library.
Related collections and offers
Overview
Discover 380 adorable dog-themed stitch motifs in I Love My Dog Embroidery, along wtih step-by-step techniques, templates, and project ideas for capturing your favorite pooch.
Created by embroidery artist MakikoArt and six other amazing embroidery artists, this fanciful collection of stitch motifs celebrates all things canine, with a wide variety of breeds represented.
With this lovely embroidery guide, you can create all manner of pups in embroidery and cross stitch, including:
- Dogs in costumes to celebrate holidays throughout the year: Halloween, Easter, and Christmas.
- Sporty pups skateboarding, parachuting, and ice skating, and dogs who are getting stuff done, like fetching the newspaper, carrying groceries, and holding a bone.
- Dogs doing what they do best—classic poses, postures, and tricks—including “roll over,” “give me your paw,” and the ever-popular “rub my tummy”
- Pooches disguised as people—the farmer, the artist, the businessman—and the sneaky but lovable mailman!
- Mutts stitched with unique accents, such as borders, frames, and alphabets
You’ll also find guidance on how to customize a motif to fit your favorite Fido, plus a gallery of project ideas for showcasing your stitches. Grab a needle and some floss and transform your home and wardrobe from drab to double-dog fabulous!
I Love My Dog Embroidery includes designs contributed by Chloe Redfern of Chloe Redfern Embroidery, Mia Alexi of How Could You? Clothing, Valentina Castillo Mora of Insanitynice, Miho Starling of mipomipo handmade, Anja Lehmann of Solipandi, and Elizabeth Dabczynski of Stitch People.

Product Details
| ISBN-13: | 9781631596148 |
|---|---|
| Publisher: | Quarry Books |
| Publication date: | 12/11/2018 |
| Sold by: | Barnes & Noble |
| Format: | eBook |
| Pages: | 120 |
| File size: | 44 MB |
| Note: | This product may take a few minutes to download. |
About the Author
Oksana Kokovkina—better known to her fans as MakikoArt—is a textile artist and jewelry designer noted for her naive and whimsical animal embroidery motifs, especially her hand-stitched custom pet portrait brooches. Born in St. Petersburg, she currently lives in Vienna, Austria.
Oksana Kokovkina—better known to her fans as MakikoArt—is a textile artist and jewelry designer noted for her naive and whimsical animal embroidery motifs, especially her hand-stitched custom pet portrait brooches. Born in St. Petersburg, she currently lives in Vienna, Austria.
Read an Excerpt
CHAPTER 1
Tools & Materials
EMBROIDERY FLOSS
The designs in this book were created and stitched with DMC six strand embroidery floss 25 (Mouline Special 25). The six strands can be separated, which gives you the option to change the thickness of your stitches.
Embroidery floss packages are labeled with a color number. Metallic embroidery floss color numbers start with the letter E followed by a number.
These label numbers are coordinated with the stitch diagrams for each design in this book so it's easy figure out which colors you will need for each motif.
A few motifs in the book use DMC Size 12 floss which is heavier than regular embroidery floss and there are no threads to separate. It's good for covering larger areas.
NEEDLES
Embroidery needles have large eyes specifically designed to use with embroidery floss and their sharp tips travel through a variety of fabrics with ease. For the designs in this book, use needle sizes 3, 5, or 7. Use the chart below to choose proper size needle based on the number of threads you need to use for your motif.
The higher the needle size, the smaller the needle!
SCISSORS
Thread snips are used for cutting embroidery floss. Fabric shears are better for cutting embroidery fabric. Make sure your scissors are sharp.
FABRICS AND HOOPS
You can use pretty much any type of fabric for embroidery — cotton, linen, felt, or wool. Fabric made for embroidery will give you the best results because the weight and weave are designed specifically for that purpose.
An embroidery hoop holds the fabric taut while stitching and will help keep it from puckering. You can use a 4-6 inch (10-15 cm) hoop for most of the
Basic Techniques
TRANSFERRING DESIGNS
1. Place a sheet of dressmaker's carbon paper in position over your fabric. Make sure the chalk side is down.
2. Use tracing paper to make a copy of the design you want to transfer. Place the tracing paper on top of the dressmaker's carbon paper.
3. Use a ballpoint pen or a stylus to trace over the motif.
4. When you press the pen or stylus, the chalk will transfer onto the fabric. If the transferred image isn't dark enough you can go over it with an aqua trick marker to darken the lines.
PREPARING EMBROIDERY FLOSS
1. Pull the loose end of the embroidery thread carefully from the package.
2. You can work with the skein or instead wrap the threads onto a cardboard bobbin, which helps avoid tangles.
3. Cut a length about 16-20 inches (40-50 cm) long.
4. Divide the thread into individual strands.
5. Align the number of threads you need together. Even if you are using 6 threads, you should divide all the threads first and then recombine them together. There is less chance the threads will knot.
THREADING THE NEEDLE
1. Bend the thread into a fold that's about 1 inch (2.5 cm) long. Use the needle to hold the thread taut which will help create a crease.
2. Push the fold through the eye of the needle.
3. Pull the folded part the rest of the way through the eye of the needle.
4. Leave about a 4 inch (10 cm) tail from the needle.
MAKING KNOTS
1. Place the needle at the end of the length of floss.
2. Wrap the floss around the needle two times.
3. With the fingers of one hand, hold onto the wrapped threads. With your other hand, pull the needle out, while holding onto the wrapped threads. Pull the wrapped threads toward the end of your length of floss to create a knot.
4. Your finished knot should look like this.
FINISHING
1. Place your needle as shown over the top of the stitches on the wrong side of the fabric.
2. Wrap the embroidery floss around the needle two times.
3. Hold the wrapped thread against the fabric with a finger. With your other hand, pull the needle out of the fabric.
4. Your finished knot should look like this.
Right Side / Wrong Side
The look of the wrong side of your embroidery piece can affect the look of the right side so keep these tips in mind:
* Begin and finish your stitches as instructed on page 45 to avoid any bumps or long threads disturbing the look of your finished piece.
* If you need to move to a new area to stitch, start a new thread or run the needle behind other threads, or the thread might show on the right side, particularly if you are working with dark thread on a light fabric.
The following photos show the right and wrong sides of finished motifs.
Using Embroidery Floss
The embroidery floss used in this book has six strands. When you separate and combine them in different numbers, your stitches and final motifs will have a variety of thicknesses. Each design in the book indicates how many strands you should use for each stitch. The images here show how different your stitches could look depending on the number of strands you stitch with.
Basic Stitch Guide
BACKSTITCH (BS)
Pull the needle out at 1 and push it in through 2. This makes one stitch. Pull the needle back up at 3 and push it in through 1. We are creating stitch by taking the thread backward. Pull the needle out at 4 and push it in through 3. Continue this pattern to finish your design. For curved lines and shapes you can make the stitches shorter.
BLANKET STITCH (BL)
A. Pull the needle out at 1. Pull the thread so it extends horizontally to the right. Push in the needle at 2 and pull it out at 3, which is parallel to 1. Be sure to keep the thread under the needle.
B. Make the next stitch by pulling the thread to the right and insert the needle at 4, which is parallel to 2. Pull the needle out at 5, which is parallel to 1 and 3. Be sure to keep the floss under the needle.
BULLION KNOT (BK)
A. Pull the needle out at 1 which will become the top of the knot. Push the needle in at 2 and pull the needle out at 3 (the same hole as 1).
B. Wrap the thread around the needle as many times as your motif requires. Use your fingers to secure the wraps against the fabric and pull the needle out.
C. Push the needle back in through 2 and tighten the knot against the fabric.
CHAIN STITCH (CH)
A. Pull the needle out at 1. Wrap the thread around the tip of the needle as shown. Push in the needle at 1 and immediately pull the needle out again at 2.
B. Pull the needle and thread until a small loop remains. This is a finished chain. Push the needle back through the same hole at 2. Use the same technique to pull the needle and thread out at 3 to complete the next chain.
C. To finish a row, push the needle back through the fabric and make a very small straight stitch which will secure the last chain, as shown by 4.
COUCHING STITCH (CS)
We've used two different colors of thread to illustrate how to work the couching stitch. Individual instructions for colors will vary.
A. Pull the main floss color out at X, then rest it along the motif line. Pull the second thread color out at 1. Push in at 2, right below 1, and make a very small straight stitch to secure the main thread in place. Pull the needle out at 3.
B. Keep making very small, evenly spaced straight stitches to hold the main thread in place along the motif line. To finish, insert the main thread color back through the fabric at Y.
CROSS STITCH (CR)
Cross stitches can be made from bottom to top, or top to bottom.
A. Pull the needle out at 1. Push the needle at 2, making a diagonal stitch. Pull the needle out at 3, parallel to 2.
B. Push the needle in at 4, which will complete the cross.
FISHBONE STITCH (FI)
A. Pull the needle out at 1, which is at the point of the design. Push the needle in at 2 the center spine of the design. Draw the needle out at 3 along the left edge of the design.
B. Push the needle in at 4, which is next to 2. Pull the needle out at 5 along the right outline of the design.
C. Push the needle in at 6, just beneath 4 and 5. Pull the needle out at 7. Continue to work diagonal stitches from the spine of the design.
FLY STITCH (FS)
A. Pull the needle out at 1. Pull the thread down at an angle and insert the needle at 2, as shown. Pull the needle out at 3.
B. Pull the thread through the fabric to form a V-shaped stitch. Make a very small straight stitch to secure the V by pushing in the needle at 4, right underneath 3.
FRENCH KNOT (FK)
Pull the needle out through 1. Place the needle close to the fabric. Wrap the thread around it twice, as shown. Hold the longer end of the thread taut with your fingers while pushing the needle back in at a point close to 1 or even into 1. Push the needle down through the fabric and pull tight.
LAZY DAISY STITCH (LD)
A. Pull the needle out at 1. Wrap the floss around the needle tip as shown. Push the needle in at 2 (this is actually the same hole as 1), then pull the needle out at 3.
B. Pull the needle and floss through the fabric until a small loop remains. Insert the needle at 4, making a tiny straight stitch to secure the loop.
C. This is the same technique used to make a chain stitch but each stitch is finished with a straight stitch.
LONG AND SHORT STITCHES (LS)
A. Pull the needle out at 1. Push the needle in at 2 and pull the needle out at 3.
B. The distance from 2 to 3 should be shorter than the distance from 1 to 2. This will give you the long and short stitches you are looking for.
C. Continue altering long and short stitches.
OUTLINE STITCH (OU)
Work this stitch from left to right.
A. Pull the needle out at 1. Insert the needle at 2 and pull the needle out again at 3, which should be halfway between 1 and 2.
B. Continue stitching by inserting the needle at 4. Pull the needle out at 5, which should be halfway between 3 and 4. This is a very handy stitch for straight and curved outlines.
RUNNING STITCH (RU)
Pull the needle through from the back to the front of the fabric at point 1 and push the needle from the front to the back at 2 to finish the stitch. Pull the needle up again at 3 and push down at 4.
Create different looks by altering the length of the spaces between the stitches. This stitch can be worked in straight or curved lines.
SATIN STITCH (SA)
Pull the needle out through 1 and push it in through 2. Pull the needle up through 3, right next to point 1. Continue this technique over the two stitch lines. The finished stitch will fill in the area as shown.
STRAIGHT STITCH (ST)
A. Pull the needle out at 1 and immediately insert at 2. That makes one straight stitch.
B. Continue making stitches by pulling the needle out at 3 and then inserting at 4. Continue by following the technique.
Using This Book
The motifs in this book each have a stitch guide that includes everything you'll need to complete the design plus a full-size template to use for tracing the motif and transferring it to your fabric. At the top of each page, there is also information that gives specific details about the motifs on that page. Read these tips to understand the embroidery diagrams.
A. Motif Number: Use this number to find the design in the book. The number is cross referenced on the photos of the stitched motifs at the beginning of the book.
B. Stitch Name: These indicate which stitch you should use for each element of the design. Refer to the Basic Stitch Guide on pages 48–53 to learn how to make each of the 15 basic stitches used in the book.
C. Number of Strands: Numbers within circles ( # ) indicate how many strands of embroidery thread to use for a particular stitch.
D. Color Number: The color of the embroidery thread is indicated with a 3 or 4 digit number. DMC brand was used to stitch all the designs in this book.
Customizing Motifs
The motifs in the book have stitch guides so you can reproduce the motif in the exact colors, but that's really just a jumping-off point. Feel free to change a few colors and create a motif of your own dog!
Creating a stitched motif of your own dog is simple. Choose a motif from the book that most closely looks like your dog and then choose thread colors to match your pup. In this example, you can see that by changing the color of the thread and using short and long stitches instead of satin stitches, a small cocoa brown dog turns into a fluffy white pup.
(Continues…)
Excerpted from "I Love My Dog embroidery"
by .
Copyright © 2019 Quarto Publishing Group USA Inc..
Excerpted by permission of The Quarto Group.
All rights reserved. No part of this excerpt may be reproduced or reprinted without permission in writing from the publisher.
Excerpts are provided by Dial-A-Book Inc. solely for the personal use of visitors to this web site.
Table of Contents
All-Time Favorites, 6,
Little Friends, 8,
Big Friends, 10,
More to Love, 12,
Just Call Me Spot, 14,
Baby, I'm a Star!, 15,
Won't You Be My Friend?, 16,
Doggy Heaven, 17,
I Love My Job Sporty Pups, 19,
Getting Into Stuff, 20,
Getting Stuff Done, 21,
Dog Days, 22,
Scruffy Chic, 23,
Dazzling Dogs, 24,
Interspecies Love, 25,
Seasons & Celebrations, 26,
Astrodogical Signs, 28,
Alpha Dogs, 30,
Look-Alikes: Pups & Their Peeps, 32,
Me Time, 36,
Doga Poses, 37,
Project Inspirations, 38,
Basic Stitch Guide, 48,
Tools & Materials, 42,
Basic Techniques, 44,
Right Side / Wrong Side, 46,
Using Embroidery Floss, 47,
Using This Book, 54,
Customizing Motifs, 55,
Stitch Guides & Templates, 56,