

Install Your Own Solar Panels: Designing and Installing a Photovoltaic System to Power Your Home
200


Install Your Own Solar Panels: Designing and Installing a Photovoltaic System to Power Your Home
200Paperback
-
PICK UP IN STORECheck Availability at Nearby Stores
Available within 2 business hours
Related collections and offers
Overview

Product Details
| ISBN-13: | 9781612128252 |
|---|---|
| Publisher: | Storey Publishing, LLC |
| Publication date: | 06/27/2017 |
| Pages: | 200 |
| Sales rank: | 290,677 |
| Product dimensions: | 7.90(w) x 9.90(h) x 0.50(d) |
About the Author
Philip Schmidt has been teaching readers how to do things for almost two decades. A former carpenter and longtime writer and editor, he is the author of 18 books, including PlyDesign, Decorating with Architectural Details, and The Complete Guide to Treehouses. He lives in Colorado with his wife, two daughters, and too many leftover building materials.
Read an Excerpt
CHAPTER 1
THE BASICS
We'll begin your Journey to electrical enlightenment with a quick overview of what goes into a home solar power system and a look at the specific components of the three main types of systems. Then we'll take a brisk walk through the installation process from start to finish. And that's pretty much all there is for the basics lesson, because then it's time to get to work.
Your first task is to make sure that a do-it-yourself (DIY) installation is not only desirable but also legal in your area. (It's not allowed everywhere.) If you give yourself the green light, great. If not, you can use this book to learn the essentials of going solar and gain confidence for choosing a good local professional solar installer and getting what you want. The next task is for everyone: determining how much electricity you use and thinking about where your solar system is most likely to go.
Anatomy of a Solar-Electric System
The science of turning sunlight directly into electricity is known as photovoltaics (PV), referring to photons of light and volts of electricity. Here's your 10-second lesson on how PV works: Solar panels, properly called PV modules (see You Say "Panels"; We Say "Modules,"), contain solar cells, which are most commonly made of layers of silicon, a semiconductor material made from sand (also the namesake of Silicon Valley). When photons of light enter a solar cell, they get absorbed and excite electrons in the silicon layers, causing them to move and, ultimately, flow continuously through a circuit of wiring that feeds into the PV system. Harnessing this electron flow is what gives you electrical power.
The electricity produced by PV modules (and used by all batteries) is direct current(DC), in which all of the electrons move in one direction only. Your home's electrical system and most appliances use alternating current (AC) power, in which the electrons move back and forth, alternating direction about 60 times per second. Therefore, PV systems include one or more inverters that convert the DC solar-generated electricity to usable AC power for your home (and, with grid-tied systems, for selling back to the utility grid).
All home PV systems start with a collection of solar-electric modules, called the PV array. The array can be installed on a roof or on the ground. The modules in an array are usually wired together in groups, each called a series-string. The series-strings are joined near the array at a combiner box or other device, and wiring from the box brings the power to the rest of the system components at the ground level. The first component that these supply lines connect to depends on the type of system. The following pages give you a snapshot of the three main systems. We'll cover system types and hardware in greater detail in chapters 3 and 4.
Grid-Tied System
A grid-tied system is by far the most common type of residential PV system, as well as the simplest and least expensive. It connects to the electric utility grid and uses the grid for both "storage" and backup. When the array creates more power than the house uses, the excess power is fed back onto the grid — turning the utility meter backward — and you get credited for it. When the house needs more than the solar array provides, the house automatically pulls power from the grid.
Advantages of grid-tied systems include simplicity, low cost, and low maintenance, making them the obvious choice for homeowners who are already using utility power, which is most homeowners. But the grid is also the main disadvantage: when it goes down, so does the PV system. This automatic shutdown function, called self-islanding, is required by utilities for grid hookup for the safety of utility personnel working on the power lines.
Grid-tied systems can use one or more string inverters, which convert power from DC to AC for a group of modules at once, or microinverters, which convert power from DC to AC at each individual module or a pair of modules. A third option is to add DC optimizers to a string inverter system. DC optimizers (see here) add some performance optimization and monitoring features offered by microinverters, but they do not convert DC to AC at the module.
Off-Grid System
The ultimate in self-sufficiency, off-grid systems have no connection to the utility grid and are therefore the best choice for homes far from utility lines. They include a bank of batteries for storing solar-generated power during the day and feeding the house with power at night. These systems also may get additional backup power from a fuel-powered (usually gas, diesel, or propane) generator, which should be installed by an electrician. All solar electricity goes through the batteries; it does not power the house directly from the array. The batteries are charged by DC power from the array and are monitored and controlled by a device called a charge controller. Battery power is converted to AC (through a DC–AC inverter) before supplying the house.
Grid-Tied System with Battery Backup
A grid-tied setup can be combined with battery backup such that solar power charges the batteries and backfeeds the grid when there's an excess. When the house needs more power than the solar array produces, it can pull from the grid or the batteries. When the grid goes down, the batteries supply power to a critical loads subpanel, which serves a few household circuits. This enables you to keep important things like the fridge, lighting, computers, and perhaps a gas furnace running during power outages. The batteries typically do not power the entire house, as this would require a larger, more expensive battery bank.
Grid-tied systems with battery backup are relatively complex, technically sophisticated, and pricey, costing significantly more than a standard grid-tied system. There are two main types of battery backup systems: DC-coupled and AC-coupled. DC-coupled systems are the historical standard, while AC-coupled systems are becoming more common and are the only type allowed by some utility companies, because they make it easier to track solar production.
A couple of important notes about grid-tied systems with battery backup:
1. Given the complexity of these systems, it's best to hire a professional for the system design and installation. (Only the installation of the array hardware is the same as that for the grid-tied and off-grid systems shown in this book.)
2. You can add battery backup to an existing grid-tied system, depending on the system type and design. If you install a standard grid-tied system now and later decide you'd like battery backup, you can easily add the components at a later time, provided you use an AC-coupled configuration. A DC-coupled system would likely require removing and rewiring the modules to accommodate the backup system's lower-voltage charge controller.
Can I Install My Own PV System?
A DIYer's Checklist
It's time for the litmus test that tells you whether to proceed boldly as an amateur solar installer or to hand over the reins to a professional. For most of you, the decision will come down to the rules of the local building authority (most likely your city, county, township, or state) or your utility provider, either of which may require that solar installations be done by a licensed professional. This is also the best time to confirm that your project won't be nixed by your zoning department, historical district standards, or your homeowner's association.
* Amateur installation is permitted by the local building authority and your utility provider.
* Requirements for amateur installation are reasonable and acceptable. Some authorities require nonprofessionals to pass tests demonstrating basic knowledge of electrical and other household systems, but such tests may not be extensive.
* You're okay with several hours of physical rooftop work (those with ground-mount systems get a pass here) AND you're wise enough to wear legitimate fall-arresting equipment (not a rope tied around your waist). You may feel as confident as Mary Poppins dancing on rooftops, but she can fly; you should be tethered.
* You don't live in a historical district or, if you do, the zoning authority permits PV systems (with acceptable restrictions).
* Your homeowner's association, if you have one, permits PV systems (with acceptable restrictions). Sometimes the homeowner's association may need a little nudging to give permission.
* You have a standard type of roofing (asphalt shingles, standing-seam metal, wood shingles, standard flat roof). If you have slate, concrete tile, clay tile, or other fragile/specialty roofing, consult a roofing professional and/or hire out the PV installation (see Don't Have Asphalt Shingles?). This is not necessarily a deal-breaker.
WARNING: PV systems are inherently dangerous and potentially deadly. As a DIY system installer and owner, you must understand, respect, and mitigate the risks involved with all installation and maintenance tasks. Pay special attention to the safety warnings given throughout this book as well as all requirements in the local building and electrical codes and equipment instruction manuals.
GOING SOLAR — FROM START TO FINISH
The installation phase of a typical residential grid-tied system takes pros about two to five days to complete, depending on the system size. It might take you and your helpers a day or two more. That's the good news. The bad news is that the entire process can easily take a few weeks and often stretches out to a few months. Why? Red tape, of course. While some communities have solar-friendly policies and procedures, many remain resistant to streamlining the approval process. Take heart, and rest assured that they, like Copernicus's detractors, must someday accept the importance of the sun.
1. Goals
Look at your electrical power usage and consider your power production goals, budget, and likely location for the PV array.
2. Site Assessment
Determine your system size (solar-electric production goal). Measure and map array installation area.
3. Design
Design the entire PV system according to your production goal. Choose modules and other main components. Complete a system plan for yourself and required documents for permitting.
4. Approval
Obtain permits from building and zoning departments, and approval from your homeowner's association or other authorities, as needed. Some utilities require an interconnection agreement as part of the approval process.
5. Shopping
Buy your PV system hardware (online or through local distributors or vendors) and have it shipped to your door. Get standard wiring, fasteners, and other basic supplies at local retailers.
6. Mechanical Installation
Install your module support structure (rooftop racking or ground-mount structure) and PV modules. Install microinverters, as applicable. Rough inspection by a city inspector typically happens here, usually before the module installation is complete.
7. Electrical Installation (Preliminary)
Run conduit between your array and the ground-level components. Install a mounting bracket or box for a string inverter, as applicable.
8. Electrical Installation (Final Connections)
This step is for your electrician. He or she will pull wires; install the string inverter, AC disconnect, and production meter; and make all final AC electrical connections for the entire PV system — up to your home's main electrical service panel.
9. Final Inspection and Utility Hookup
Pass the final inspection by the city inspector, and bring in the utility worker to install the net meter and make the connection to the power grid.
10. PTO
Obtain your Permission to Operate (PTO) letter from the utility. Then turn on your PV system and start using solar-generated power!
Working with Solar Professionals
Even if you're planning to do as much of the installation yourself as possible, you'll need an electrician for everything on the AC side of the system, including the final hookup to the house electricity. You may also need to hire a solar professional, architect, or engineer to approve your design, especially if such approval is required for a permit. For those of you who have abandoned the DIY option, an experienced solar installer is the best way to go. Here is a basic rundown of the solar pros who can advise and assist you in going solar.
Meet the Solar Pros
Electrician. A licensed electrician experienced with residential PV installation can perform the final electrical installation as well as help with any other aspect of the electrical design. If you have experience with electrical equipment installation, you might negotiate a plan wherein you install boxes, run conduit, and do other grunt work, and your electrician pulls all the wiring and connects all the components. If you're a beginner, turn everything over to your electrician after the array is installed. In any case, all AC connections must be made by a licensed electrician. Contract with your electrician during the design phase so all parties know what to expect before installation begins.
Architect/engineer. Architects and engineers can help with structural design considerations and specifications, such as roof attachment, roof loads, ground-mount structure design and installation, and specialty mounting systems, like those for flat roofs. The local building authority might require an engineer's stamp on any installation plan. Review and approval of detailed plans might cost several hundred dollars, while design services and expert advice might be charged at an hourly rate.
Solar w/consultant. A DIYer might hire a local solar installer to consult on the design, provide technical help, or purchase system equipment at a competitive price. If you'd like to get this kind of à la carte help from an installer or company, just keep in mind that the installer's time is money, just like everyone else's. It's fine to call up one or more installers and ask about their services and discuss how they might help with your project, but resist the urge to pump them for free advice; their expertise is valuable.
Solar installer. Solar installers offer turnkey planning, design, and installation services. They also apply for rebates that lower your cost and advise you about tax breaks and other incentives that homeowners must apply for themselves (again, always check with your tax adviser). Good installers offer competitive warranties for their work and system components, and many are happy to provide technical assistance down the road (within reason, of course).
If You Don't DIY: Tips for Choosing a Solar Professional
Choosing a solar professional to install your system is, in many ways, a lot like finding any other home contractor, and the basics of due diligence certainly apply: get more than one bid, ask for references, and look at the company's history and reputation. But given the relative youth and rapid growth of the industry — and the fact that much of your investment will be tied up in the solar equipment — it's especially important to check for expertise, experience, and solid products and warranties.
* Look for expertise with PV systems. Even if a company is relatively new, it should have experienced installers in charge. At least one member of the installation crew should have PV Professional Installation certification from the North American Board of Certified Energy Practitioners (NABCEP). You can ask for proof of NABCEP certification, as well as the license number of the electrician who will perform the final AC hookups. Installation companies commonly have to provide these when bidding for certain jobs.
* Check the member directories of local industry associations if you need a place to start your search. The Solar Energy Industry Association (SEIA) and the American Solar Energy Society (ASES), two of the biggest national groups, sponsor many state and regional chapters. For example, the Colorado chapter of SEIA is called COSEIA; California's is CALSEIA.
* Expect turnkey service. Design, installation, permits, paperwork, rebates, utility hookup — the works. You shouldn't be asked to do anything a pro normally does.
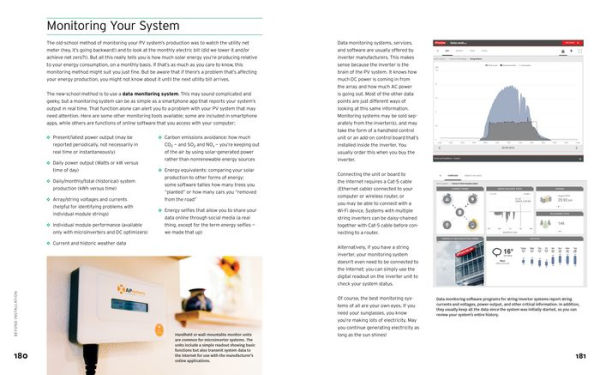
* Data monitoring. Most inverters include monitoring capability (hardware and software) that allows you to check your PV system's performance from a computer or other device. Your solar professional should know how to hook up this function and teach you how to use it.
(Continues…)
Excerpted from "Install Your Own Solar Panels"
by .
Copyright © 2017 Joseph Burdick and Philip Schmidt.
Excerpted by permission of Storey Publishing.
All rights reserved. No part of this excerpt may be reproduced or reprinted without permission in writing from the publisher.
Excerpts are provided by Dial-A-Book Inc. solely for the personal use of visitors to this web site.
Table of Contents
Introduction1 The Basics Anatomy of a Solar-Electric System Can I Install My Own PV System? Going Solar – From Start to Finish Working with Solar Professionals Answering the Big Three2 Assessing Your Site Measuring Area, Slope, and Azimuth Sizing Your System with PVWatts Snow, Wind, and Shade3 Choosing PV Hardware Modules Module Support Structures Inverters and DC Optimizers4 Designing Your System PV Circuit Fundamentals The Design Process Sample System Designs One-Line Electrical Diagrams Wire Types for PV Systems5 Getting Ready to Install Permitting and Inspections Shopping Solar Solar Financials Assembling Your Crew6 Mechanical Installation: Rooftop Laying Out the Racking Installing Footers and Rails Installing Modules7 Mechanical Installation: Ground-Mount Setting the Support Posts Assembling the Ground-Mount Structure8 Electrical Installation Final Project Steps Running Conduit Component Connections Final Inspection and Turning On Your PV System9 Off-Grid System Design Off-Grid Basics Batteries Sample Off-Grid System Design10 Beyond Installation: Tips for Troubleshooting, Maintaining, and Monitoring Your PV System PV Safety Rules Shutdown and Startup Procedures Maintenance and Troubleshooting Monitoring Your System Acknowledgments Glossary Metric Conversions IndexCustomer Reviews
Explore More Items

")


