


eBook
Available on Compatible NOOK devices, the free NOOK App and in My Digital Library.
Related collections and offers
Overview

Product Details
| ISBN-13: | 9781590128855 |
|---|---|
| Publisher: | Annie's |
| Publication date: | 11/01/2017 |
| Sold by: | Barnes & Noble |
| Format: | eBook |
| Pages: | 36 |
| Sales rank: | 737,112 |
| File size: | 14 MB |
| Note: | This product may take a few minutes to download. |
About the Author
Read an Excerpt
CHAPTER 1
Tapestry Crochet Basics
Tapestry crochet is a wonderful technique that will allow you to add colorwork to your projects. One or more strands of yarn are carried and wrapped in the stitches of the working color. Then, colors are switched by following a pattern to make a specific design. There are no floats on the wrong side of the work, and you make a stronger weave.
Depending on the piece you are making, you will crochet one or more foundation rows or rounds without carrying any alternate color and then move on to the tapestry portion of the project.
There are several ways to work with this technique, and in this book we will cover 3 variations:
- Tapestry crochet with single crochet worked in rows
- Tapestry crochet with back loop single crochet worked in the round
- Tapestry crochet with back loop double crochet worked in the round
Basic Steps to Carry & Wrap the Additional Yarn
Tapestry crochet with single crochet worked in rows
After the foundation row, start the first row of the tapestry pattern. Chain 1 and start the first single crochet: Insert the hook in the stitch, yarn over and pull through the stitch (see photo 1), leaving a 4-inch tail, place the new color in between your hook and the working yarn (see photo 2), yarn over with the working yarn and close the first single crochet (see photos 3 and 4).
Your alternate color is now wrapped in the first single crochet.
To continue, insert your hook in the next stitch, working under the alternate color (see photo 5), and complete the single crochet with the strand wrapped again (see photo 6). Repeat for each single crochet across.
Tapestry crochet with back loop single crochet worked in the round
After the foundation round or rounds, start the first round of the tapestry pattern. Begin the first single crochet as follows: Chain 1, insert the hook in the back loop of the same stitch as the join, yarn over and pull up a loop (see photo 7), leaving a 4-inch tail, place the new color between your hook and the working yarn (see photo 8), yarn over with the working yarn (see photo 9) and close the first back loop single crochet (see photo 10). Your alternate color is now wrapped in the first back loop single crochet.
Place a marker in the first back loop single crochet of each round, as it will be useful when closing rounds.
To continue, insert your hook in the back loop of next single crochet, working under the alternate color (see photo 11), and complete the back loop single crochet with the strand wrapped again (see photo 12). Repeat for each single crochet across.
Tapestry crochet with back loop double crochet worked in the round
After the foundation round, start the first round of the tapestry pattern. Chain 3 and start a double crochet in the back loop of the next stitch: Yarn over, insert the hook in the back loop, yarn over and pull through the stitch (see photo 13), leaving a 4-inch tail, place the new color in between your hook and the working yarn (see photo 14), yarn over with the working yarn (see photo 15) and pull through two loops on the hook, yarn over and pull through the last two loops on the hook (see photo 16). Your alternate color is now wrapped in the back loop double crochet.
To continue, yarn over and insert your hook in the back loop of next stitch, working under the alternate color (see photo 17), and complete the back loop double crochet with the strand wrapped again (see photo 18). Repeat for each stitch across.
Color Changes
Do the same in every variation: Work the last stitch before the color change to just before the last yarn over, drop the working color, yarn over with the new color (see photo 19) and close the stitch (see photo 20). Then wrap the other color instead and switch colors again according to the pattern (see photos 21 and 22).
Tip: Use a system that prevents yarn from getting tangled with the colorwork. Ball holders (see photo 23) keep each color in the same position for the whole project and make it easy to pick each yarn from its source to switch.
Ending & Beginning of Rows & Rounds
Tapestry crochet with single crochet worked in rows
Work to the last single crochet by wrapping the alternate color (see photo 24), turn.
Chain 1 and start the first single crochet: Insert the hook in the stitch, working under the yarn to be wrapped (see photo 25), yarn over with the working yarn (see photo 26) and complete the single crochet with the strand wrapped again (see photo 27). Your alternate color is wrapped from the first single crochet of every row.
Tapestry crochet with back loop single crochet worked in the round
Work to the last single crochet of the round by wrapping the alternate color or colors (see photo 28), remove the marker of the first back loop single crochet, insert your hook in the stitch by working under both loops and the alternate color (see photo 29), yarn over with the working yarn (see photo 30) and pull through the stitch, making a slip stitch to close (see photo 31).
Now you are ready to start the next round with the alternate color in place to be wrapped in the first back loop single crochet.
Tapestry crochet with back loop double crochet worked in the round
Work to the last double crochet of the round by wrapping the alternate color (see photo 32), insert your hook in the 3rd beginning chain, working under the alternate color (see photo 33), yarn over with the working yarn (see photo 34) and pull through the chain making a slip stitch to close (see photo 35).
Now you are ready to start the next round with the alternate color in place to be wrapped in the first back loop double crochet.
Additional Notes
Eyelets (for Tie-Up Choker and Drawstring Bag): Work under the alternate color or yarns with your hook, yarn over with the working yarn (see photo 36) and complete a single crochet with the yarn wrapped (see photo 37).
Repeat for the number of single crochets indicated in the pattern (see photo 38) and skip the same amount of single crochets from the last row or round, then continue crocheting over the single crochet of last row or round (see photo 39).
Wrapped Yarn: Depending on the yarn you're working with, you will see more or less of the underlying color or colors when working tapestry crochet with single crochet. This is normal and it's not necessary to pull the alternate color unless you see a very obvious bump. When working in double crochet, where stitches are a bit more open, pull the yarn a little after making some stitches to straighten the bumps that show through the other color in your work.
Fastening Off: When finishing the tapestry crochet portion of the project, cut the wrapped yarn(s), leaving a 4-inch tail. Weave in the ends.
CHAPTER 2
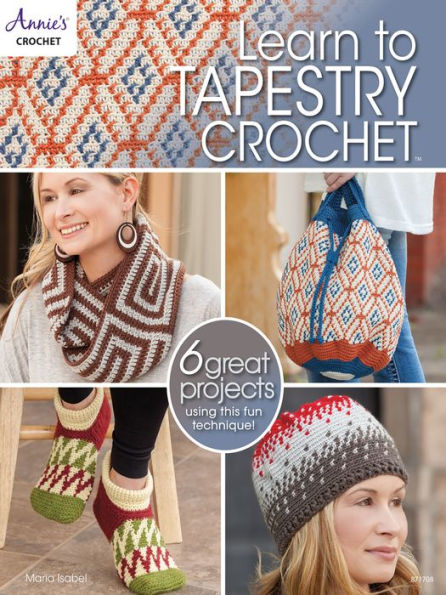
Tie-Up Choker
Skill Level
INTERMEDIATE
Finished Measurements
Choker: 12 ¼ inches wide x 1 ¼ inches long
Tie-Up Lace: 18 ½ inches long
Materials
• Omega Eulali super fine (fingering) weight cotton yarn (3 ½ oz/394 yds/100g per skein): 1 skein each #18 cream and #94 steel
• Size C/2/2.75mm crochet hook or size needed to obtain gauge
• Tapestry needle
Gauge
31 sts = 4 inches; 7 rows = 1 inch
Pattern Notes
Foundation row and last row are worked with 1 strand of yarn without carrying alternate color.
Weave in ends as work progresses.
When changing color in Pattern Stitch, carry and work over color not in use on wrong side of tapestry crochet section. Do not cut or fasten off unless otherwise stated.
Choker Pattern can be worked by following written instructions or Chart. Follow Chart rows 1, 3, 5 and 7 from right to left and rows 2, 4 and 6 from left to right.
Pattern Stitch
Choker Pattern
Row 1: With steel, ch 1, sc in each of first 4 sc, change color(see Tapestry Crochet Basics and Pattern Notes) to cream in last st, sc in each of next 89 sc, change color to steel, sc in each of last 4 sc, turn. (97 sc)
Row 2 (RS): With steel, ch 1, sc in first sc, working over cream, work 2 sc (see photos 37 and 38 in Tapestry Crochet Basics — eyelet made), sk 2 sc, sc in each of next 4 sc, [change color to cream, sc in each of next 3 sc, change color to steel, sc in each of next 5 sc] 10 times, change color to cream, sc in each of next 3 sc, change color to steel, sc in each of next 4 sc, working over cream, work 2 sc (eyelet made), sk 2 sc, sc in last sc, turn.
Row 3: With steel, ch 1, sc in each of first 4 sc, change color to cream, sc in each of next 2 sc, [change color to steel, sc in next sc, change color to cream, sc in each of next 3 sc] 21 times, change color to steel, sc in next sc, change color to cream, sc in each of next 2 sc, change color to steel, sc in each of last 4 sc, turn.
Rows 4 & 5: Rep row 3.
Row 6: With steel, ch 1, sc in first sc, working over cream, work 2 sc (eyelet made), sk 2 sc, sc in next sc, change color to cream, sc in each of next 2 sc, [change color to steel, sc in each of next 5 sc, change color to cream, sc in each of next 3 sc] 10 times, change color to steel, sc in each of next 5 sc, change color to cream, sc in each of next 2 sc, change color to steel, sc in next sc, working over cream, work 2 sc (eyelet made), sk 2 sc, sc in last sc, turn.
Row 7: Rep row 1.
Choker
With steel, ch 98.
Foundation row (RS): Starting in 2nd ch from hook, sc in each ch across, turn. (97 sc)
Rows 1–7: Work rows 1–7 of Choker Pattern(see Pattern Stitch). Cut cream at end of row 7.
Last row: With steel, ch 1, sc in each sc across. Fasten off.
Tie-Up Lace
With cream, ch 161.
Row 1: Starting in 2nd ch from hook, sl st in each ch across. Fasten off. (160 sl sts)
Assembly
On RS of Choker, pull each end of Tie-Up Lace through each lower eyelet (front to back). Cross the lace once, pull each end through each upper eyelet (front to back) and tie.
CHAPTER 3
Diamond Bracelet
Skill Level
INTERMEDIATE
Finished Measurements
2 ¾ inches wide x 7 ½ inches long, unsnapped
Materials
• Omega Eulali super fine (fingering) weight cotton yarn (3 ½ oz/394 yds/100g per skein): 1 skein each #21 sand and #55 grape
• Sizes C/2/2.75mm and H/8/5mm crochet hooks or size needed to obtain gauge
• Tapestry needle
• 10mm snaps: 2 sets
• Sewing needle and matching thread
Gauge
Size C hook: 31 sts = 4 inches; 7 rows = 1 inch
Pattern Notes
Foundation row and last row are worked with 1 strand of yarn without carrying alternate color.
Weave in ends as work progresses.
When changing color in Pattern Stitch, carry and work over color not in use on wrong side of tapestry crochet section. Do not cut or fasten off unless otherwise stated.
Diamond Pattern can be worked by following written instructions or Chart. Follow Chart rows 1, 3, 5, 7, 9, 11 and 13 from right to left and rows 2, 4, 6, 8, 10 and 12 from left to right.
Pattern Stitch
Diamond Pattern
Row 1: With grape, ch 1, sc in each of first 5 sc, [change color(see Tapestry Crochet Basics and Pattern Notes) to sand in last st, sc in next sc, change color to grape, sc in each of next 2 sc, change color to sand, sc in each of next 2 sc, change color to grape, sc in each of next 2 sc, change color to sand, sc in each of next 3 sc, change color to grape, sc in each of next 2 sc, change color to sand, sc in each of next 2 sc, change color to grape, sc in each of next 2 sc] 3 times, change color to sand, sc in next sc, change color to grape, sc in each of last 5 sc, turn. (59 sc)
Row 2 (RS): With grape, ch 1, sc in each of first 7 sc, [change color to sand, sc in each of next 2 sc, change color to grape, sc in each of next 2 sc, change color to sand, sc in each of next 2 sc, change color to grape, sc in next sc, change color to sand, sc in each of next 2 sc, change color to grape, sc in each of next 2 sc, change color to sand, sc in each of next 2 sc, change color to grape, sc in each of next 3 sc] twice, change color to sand, sc in each of next 2 sc, change color to grape, sc in each of next 2 sc, change color to sand, sc in each of next 2 sc, change color to grape, sc in next sc, change color to sand, sc in each of next 2 sc, change color to grape, sc in each of next 2 sc, change color to sand, sc in each of next 2 sc, change color to grape, sc in each of last 7 sc, turn.
Row 3: With grape, ch 1, sc in each of first 6 sc, [change color to sand, sc in each of next 2 sc, change color to grape, sc in each of next 2 sc, change color to sand, sc in each of next 2 sc, change color to grape, sc in each of next 3 sc, change color to sand, sc in each of next 2 sc, change color to grape, sc in each of next 2 sc, change color to sand, sc in each of next 2 sc, change color to grape, sc in next sc] twice, change color to sand, sc in each of next 2 sc, change color to grape, sc in each of next 2 sc, change color to sand, sc in each of next 2 sc, change color to grape, sc in each of next 3 sc, change color to sand, sc in each of next 2 sc, change color to grape, sc in each of next 2 sc, change color to sand, sc in each of next 2 sc, change color to grape, sc in each of last 6 sc, turn.
Row 4: With grape, ch 1, sc in each of first 5 sc, change color to sand, sc in each of next 2 sc, [change color to grape, sc in each of next 2 sc, change color to sand, sc in each of next 2 sc, change color to grape, sc in each of next 2 sc, change color to sand, sc in next sc, change color to grape, sc in each of next 2 sc, change color to sand, sc in each of next 2 sc, change color to grape, sc in each of next 2 sc, change color to sand, sc in each of next 3 sc] twice, change color to grape, sc in each of next 2 sc, change color to sand, sc in each of next 2 sc, change color to grape, sc in each of next 2 sc, change color to sand, sc in next sc, [change color to grape, sc in each of next 2 sc, change color to sand, sc in each of next 2 sc] twice, change color to grape, sc in each of last 5 sc, turn.
Rows 5–7: Rep rows 1–3.
Row 8: Rep row 2.
Row 9: Rep row 1.
Row 10: Rep row 4.
Row 11: Rep row 3.
Row 12: Rep row 2.
Row 13: Rep row 1.
Bracelet
With grape and C hook, ch 60.
Foundation row: Starting in 2nd ch from hook, sc in each ch across, turn. (59 sc)
Rows 1–13: Work rows 1–13 of Diamond Pattern(see Pattern Stitch). Cut sand at end of row 13.
Last row: With grape, ch 1, sc in each sc across. Fasten off.
Chain Edging
Make 2.
Cut 6 39?-inch-long strips of sand. With strips tog and H hook, ch 26, leaving a 2?-inch tail at beg. Fasten off. Tie a knot on each end. Trim ends evenly.
Assembly
On RS of Bracelet, with 2 strands of grape, sew each Chain Edging to upper and lower edges of Bracelet, along width of Diamond Pattern only.
Sew snap pieces 3 rows from upper and lower edges so grape sections overlap.
CHAPTER 4
Spiraling Cowl
Skill Level
INTERMEDIATE
Finished Measurements
6 inches wide x 53 ½ inches in circumference
Materials
• Universal Yarn Uptown Worsted medium (worsted) weight acrylic yarn (3 ½ oz/180 yds/100g per skein): 1 skein each #336 coffee and #353 Donahue
• Size H/8/5mm crochet hook or size needed to obtain gauge
• Tapestry needle
Gauge
14 sts = 4 inches; 8 rows = 4 inches
Pattern Notes
Foundation round and last round are worked with 1 strand of yarn without carrying alternate color.
Weave in ends as work progresses.
Chain-3 at beginning of round counts as first double crochet unless otherwise stated.
Join with slip stitch in the first stitch of each round unless otherwise stated.
When changing color in Pattern Stitch, carry and work over color not in use on wrong side of tapestry crochet section. Do not cut or fasten off unless otherwise stated.
Spiral Pattern can be worked by following written instructions or Chart. Follow Chart rounds 1–11 from right to left.
(Continues…)
Excerpted from "Learn to Tapestry Crochet"
by .
Copyright © 2017 Annie's.
Excerpted by permission of Annie's.
All rights reserved. No part of this excerpt may be reproduced or reprinted without permission in writing from the publisher.
Excerpts are provided by Dial-A-Book Inc. solely for the personal use of visitors to this web site.
Table of Contents
Tapestry Crochet Basics,
Tie-Up Choker,
Diamond Bracelet,
Spiraling Cowl,
Blending Colors Hat,
Spanish Tile Bag,
Peaked Waves Slippers,
General Information,
Pattern Services and Revisions,
Stitch Guide,
Metric Conversion Charts,